


*This article first appeared in Ride UK (#65) and is reproduced here by kind permission of Ride UK.
Well it seems winter is here. It hasn’t dried up properly in weeks, and with only 25 minutes of daylight a day its unlikely to dry up anytime soon.
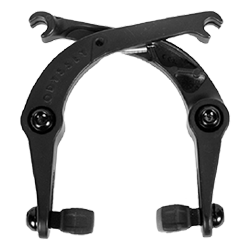
Indoor parks are one of the best refuges from the weather but they come with strings attached. With shady lawyers salivating over the cash they can make from suing anyone and everyone for the slightest injury, lots of parks have been forced to bring in rules about brakes. Brakes can be a pain in the arse. They add a couple of pounds to the weight of your bike and can give you more trouble than any other part. So to ease the pain I thought I would try to write down a few hard learned tricks to perfecting them.
Now I am well aware that these tech columns can be hard going, so if you are feeling like you are about to bail on me, at least read this next paragraph.
If your brakes seem impossible, or just a bit dodgy, if you are on the verge of kicking the shit out of the bastards because they just wont work no matter what remember this:- LUBE THE F-KING CABLES!
I cant stress this enough. Good cables come with a teflon sleeve inside and the manufacturers of the cables make a big deal out of it. Teflon has an incredibly low coefficient of friction and will glide as smooth as glass, it’s the special ingredient in non-stick pans and is a super-duper space race spin-off. But I say bollocks to that. Don’t rely on it alone. Buy yourself a little tube of a good thin teflon lube. Little tubes are more controllable than an aerosol. And absolutely drench the cables in it. You’ve got to get it down between the inner wire and the liner which can be tricky with gyro cables etc. You need to get enough down there that it starts dripping out the other end. 90% of the time this is the difference between shit brakes that drive you mad, and the smoothest slickest brake you ever felt. So I will say it again; LUBE. THE. F-KING. CABLES!!!!
Ok so there is now no doubt in your mind that lubing the cables is the single most important part of good brakes? Are you certain? You WILL piss thin lube down the cables until it comes out the other end wont you? Its no use using thick chain lube and gumming it all up. Get some thin stuff. Even grandad’s “3-in-1” out in the shed will work OK. OK?
SO now you have the brakes working OK and the cables run super super smooth but it still feels a bit shit. The lever seems to flex so much that you crush your knuckles and the brakes make a horrible horrible squeaking noise. But all this is easily fixed. If you want to know how read on…
A lot of riders who run brakes these days run dual cable systems to their gyros instead of the more traditional two-into-one gyro cables that come stock with your gyro. This has several advantages. First off it lets you get the cables EXACTLY the right length. Since gyro cables don’t have to move and flex as the bars move they have the potential to be very very smooth running and almost flex free. There is no need for the cables to be any longer than necessary and this can help make everything work beautifully.
Another advantages of a custom dual cable set-up is that there is less cable stretch. Everything moves when you load it. If you put an ant on a 15ton block of granite the granite has to move to support the weight of the ant. Cables are no different. When you pull the lever the cable stretches. The amount of stretch is proportional to how hard you pull and the cross sectional area of cable. Obviously using two cables means more cross section and therefore less stretch. BUT dual cables also sometimes means more housing and so more friction, so don’t you dare neglect lubing the living shit out of those cables.
There is no hard and fast way to do a dual cable set-up. I have seen lots of different arrangements and they all seem to work. Its no use my writing out step by step how to set duals up because every bike is different and every rider likes his brakes different. However there are a few useful tips I can pass on.
Obviously one of the major problems is finding ways to “stop” all the outer cables. Lots of frames these days come with dual cable mounts but if yours doesn’t its no problem. Odyssey makes a think called a “London Mod.” no idea how this got its name really people have been drilling three little holes in an old bit of plate for years to set these up. All you do is bolt the middle hole to the existing single cable guide and run the two brake cables through the outer holes. If you buy an Evolver brake you get all this kind of stuff which is dead handy but if not it really is a piece of piss to make your own.
As I said just find an old bit of ally like an old brake arm and cut a straight bit off. Drill three holes in it and off you go. If you have access to a few tools you might even want to tap a thread (M6) in the outer holes to take barrel adjusters. If you cant be arsed even drilling three holes there is another even easier way. The “Damo” mod. (named after Damian Mckenna who was the first person I ever saw with it back in like ’92). The Damo Mod. consists of an old gyro cable center “slug” with all the cables and innards removed. Once you have the “slug” gutted, you just tape it onto the frame above the existing cable guide. The two outer cables “stop” in the two end holes and both inners carry on through to emerge side by side from the frame cable guide. These work super well but don’t have the individual adjusters of the “London Mod.”. HOWEVER the individual adjusters of the London Mod. Can be deceptive. Its useful to have them but you need to sit down and take a moment to really think about how a dual cable set-up works. The lengths of the cables are not the whole story in adjusting everything right.
Suppose you have just set up a dual cable system on your bike. You have one cable from each side of the gyro (with the cable nipple filed down a bit to clear the top gyro plate as it turns). Each cable runs through the bottom gyro plate adjuster and into a lavishly well oiled outer cable. This outer cable runs in a smooth kink free line to the “Damo Mod.” where it meets up with the one from the other side.
The “Damo Mod.” is securely butted up against the frame cable guide to stop it slipping down the tube under braking load. The inner wires emerge together from the frame cable guide and run down to either arm of the brake. One sits in the original cable clamp bolt whilst the other has been securely locked in a G-Sport Nipple Clamp (Statutory notice; other cable clamping devices are available {including just crimping an old spoke nipple on there and so avoiding giving your hard earned cash to shameless capitalist so called “rider owned” companies who really couldn’t give a toss if your brakes work or not}). After carefully checking everything you pull the brake to see how it feels and it absolutely sucks shit. WHY? Well. You need to remember that in the old “two-into-one” set up you had before you could “balance” the gyro by just adjusting the cable lengths with the adjusters but now you ALSO have to balance the springs in the brake arms to balance the gyro!
Dual cabling for the top section is a little harder but still well within the means of most riders. You need to sit down and think out the way you will clamp the cables but converting a lever to pull two inners is hardly rocket science.
Again you can use a “London Mod.” type adaption to run one cable on each side of the lever or you can use a “Damo Mod.” style adaption to make a poor-mans-modulever.
The problem is always clamping the inner cables. Knarps can be used on the outside but crimping on spoke nipples is just as good as long as you get them really really secure and make sure you use brass spoke nipples. I used to do this at the gyro end and used a bench vice to crush them on super super hard. I never had one slip but then I did break a bench vice once, that’s how hard I squashed them on… With the modulever style set-ups you need to make or modify a nipple clamp but I have heard of people soldering their own custom nipples on the end…. There is loads of stuff about this kind of thing on the internet so if you cant find what you need here go for a surf… (God that sounded cheesy)
A well set-up gyro will (in my opinion) always out perform a basic cable, it takes more time and effort to set-up but once you get it right you can forget about it for a long long time while single cables die pretty damn quick. Of course single cables are lighter and simpler so a lot of people naturally prefer them. Having such a long length of outer obviously makes lubing the cables just as important as with any gyro system but the same rules apply, piss thin lube and lots of it! The major drawback of single cables is that a single tailwhip or barspin can make the brake run and drain some of your speed. Some riders have experimented with using mountainbike gear cables instead of normal brake cables.
The mountain bike gear cable is designed to resist compression and has the wires wound in a series of long gentle spirals running parrallel to each other instead of the brake cables single “spring” of fat square wire. Most riders who try these seem to love them at first and everything goes well. A spin of the bars or tailwhip makes very little difference to the position of the brake arms and they rarely rub. Unfortunately the effect doesn’t seem to last. After a few weeks things start to get too much for the gear cable and it turns into a frayed mess. By all means give it a go but don’t say I didn’t warn you…
Whatever brake cable set-up you run there can be problems with the actual brakes too. A common one is to have one brake arm binding on the back, people adjust the spring (often to destruction) and one arm just refuses to move. Often this problem can be fixed by taking the arm off and sanding the outer surface of the boss slightly, but whatever you do NEVER file or sand the top of the boss. If this doesn’t work then it may well be that you have “crushed” the boss by overtightening the bolt on top. Too much pressure on here can crush the boss until the gap between the bottom rim of the boss and the top cap is just too small for the brake arm to move freely.
If you have done this then there is a cure. All you have to do is file the brake arm pivot tube (the brassy bit) down to a slightly shorter length. Take care and only take a very little bit off at a time…
The other common problem is of course, squeal.
Brake squeal is horrible, it alerts security guards to your presence and makes you grimmace. If you trawl through a lot of internet sites you will probably find lots of suggestions like cleaning your rims or putting coke on them or some rubbish like that. This wont get rid of squeal. Squeal is vibration, very high speed oscilation and it comes from the brake blocks themselves. Its all down to “toe-in”. If the brake pad hits with its front end first the drag on the rim will cause it to move slightly away from the rim and it settles down. If on the other hand the back end hits first, the drag on the rim tries to push the block forwards into the gap between brake arm and rim, it soon meets resistance to this and “bounces back” before doing this again. This all happens in a fraction of a fraction of a second and makes a horrible squealing noise. To cure it, just wrestle for a few hours with those funny dished washers on the brake block mounts until the front end of the block hits well before the back….
One last point. If you have tried all this and your brakes still seem shed try sanding the brake blocks slightly, just enough to take the polish off, just be careful to keep it absolutely flat, you dont want to sand a curve onto the face…
Next month some stuff about headsets…